Calendar
Departmental Resource Calendars
Procedure
Complete the Departmental Resource Calendar Request Form with the information below to request a Resource Calendar.
Required Information for Setup
Department ID: This is the abbreviation or acronym for your Department eg. Western Technology Services Department ID is "WTS". This ID will preface all of your department resource calendars.
Building and Room Number: Resource Calendars can now contain building and room number details. It is recommended you use the exact building and room number and avoid generic names such as "MeetingRoom1" e.g. WTS-SSB-3333
Seating Capacity: The seating capacity of meeting rooms can now be specified when the calendar is created.
Resource Type: This specifies whether a resource is a Meeting Room, a project room, or a piece of equipment e.g WTS-SSB-3333-MeetingRoom
Calendar Owners: Please specify the UWO User ID's of the Owners of the resource calendar.
Membership: By default, Department Resource Calendars will be accessible by everyone in a Department. If you require a resource calendar only for certain individuals or a subset of your Department, then we will need a list of UWO User ID's for all the requested members.
Characteristics of Resource Calendars
Membership: Membership to a Resource Calendar is now controlled through Western's Active Directory structure. Requests to add or remove individuals or modify resource calendar permissions must be submitted to Service Desk.
Double Booking: Resource Calendars do not allow for double booking by default. This behaviour can be changed upon request.
Check Availability: Resource Calendars are automatically set to "Busy" upon being invited to a meeting. This is to help avoid double-booking a resource or room.
Booking in Advance: Resources by default can be booked 365 days (One Year) in advance. This timeframe can be changed upon request.
Recommendations on Booking Resource calendars
We recommend individuals create events in their personal calendars and then inviting attendees/resources. By creating an event directly within a resource calendar the resource is identified as the meeting organizer. This can cause problems with:
- Receiving notifications from potential invitees as to their intentions to attend the meeting.
- Resolving scheduling conflicts can be difficult because no one knows who to approach about changing a time or room.
Free/Busy Information
Free/Busy information in Office 365 is composed of 2 separate but related parts: Free/Busy Information and Presence. Free/Busy is tied to your Presence and vice versa, but they are separate features. Free/Busy indicates your availability in the future, whereas Presence indicates your status at that moment.
Free/Busy and Availability in Office 365 is controlled primarily through your Calendar. Your Free/Busy status will change automatically based on your existing Calendar appointments e.g. if you're in a meeting, your Free/Busy and Presence information will show "Busy". Users have the ability to restrict who else can see their Free/Busy information. Presence is always displayed unless you are signed out of Skype for Business and the Outlook Web App at the same time.
Procedure
Restricting Your Free/Busy Information
Some users may wish to restrict who can see their Free/Busy information. This can only be done from a full Desktop client such as Outlook 2019.
Outlook 2016/19
- Click on File, then Options
- In the left pane, click Calendar
- Under Calendar Options, click on Free/Busy Options
- Under Permissions, set permissions to "None"
- Click Apply, Click Ok
Manually Granting Free/Busy Lookup to Others
Outlook Web App (OWA) [New and Old]
- Go to https://myoffice.uwo.ca and login, go to your Calendar
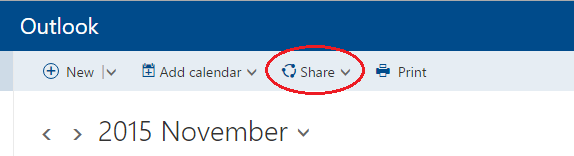
- Select the Calendar you wish to share, click the Share button in the top right corner
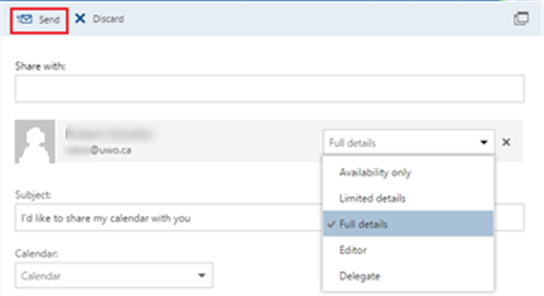
- Enter the Email Address of the person you wish to share your calendar with in the “Share with:” field. Choose what permissions they have using the Permissions dropdown box.
- Availability Only - users can only see if you're free/busy
- Limited Details - Shows Free/Busy and the Subject of any events in your Calendar
- Full Details - Shows your Free/Busy and all Calendar details (location, other attendees)
- Enter a personal subject line if desired, and click the Send button
Outlook 2016/19
- Open Outlook, go to your Calendar
- Select the Calendar you want to share, click the Share Calendar button at the top
- Click Add...
- Enter the email address of the person you wish to share your Calendar with
- Use the “Details” dropdown to set your Calendar detail visibility
- Availability Only - users can only see if you're free/busy
- Limited Details - Shows Free/Busy and the Subject of any events in your Calendar
- Full Details - Shows your Free/Busy and all Calendar details (location, other attendees)
- Enter a personal message if desired and click Send
Book a Resource Calendar
Procedure
There are multiple ways a meeting can be booked utilizing a Resource Calendar. Pick the method you are most comfortable with.
Outlook 2016/2019
- Click the Calendar button

- In the upper left, click New Meeting
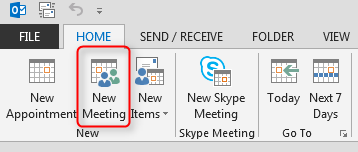
- Fill in your attendees, the Subject, the date/time of the meeting, and any other options such as reminder or recurrence
- There are 4 main ways of booking a resource calendar:

- Invite the Resource Calendar as an Attendee. Calendars addresses are in the format of CAL-Department-Building-Room@uwo.ca (ex. CAL-ITS-SSB-3333@uwo.ca) and can be found by entering your Department code (ex. WTS) and clicking the Check Names button.
OR - Click the drop-down menu for Location. Any resource calendar you have previously booked will show up.
OR - Click the Rooms button. You will see a list of every available resource calendar, sorted alphabetically.
OR - Click the drop-down under "Show a room list" and select the room list for your department. You will see just the resource calendars in your department. Please note WTS is in the process of creating room lists, so one may not be present for your department yet.
- Click the Send button to send your meeting invite
NOTE: Outlook keeps track of time zones and daylight saving time so that events automatically appear at the correct time on your calendar. When you create a new meeting or appointment, Outlook uses the default time zone in your Outlook preferences for Calendar. You can specify a different time zone for an event as you are creating it. To display the Time zone selector, on either the Organizer Meeting tab or the Appointment tab, click Time Zones.
Outlook Web Access (OWA)
- Go to https://myoffice.uwo.ca and login, go to Calendar
- In the upper left, click New
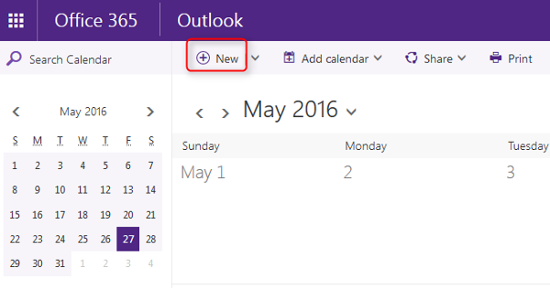
- Fill in your attendees, the Subject, the date/time of the meeting, and any other desired options such as reminder or recurrence
- There are 2 main ways of booking a resource calendar:
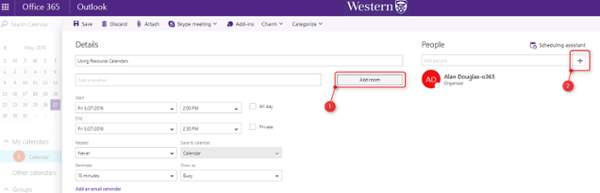
- Click Add Room, select your department meeting room list, and select the desired resource calendar. Please note WTS is currently in the process of creating meeting room lists. If you do not see a meeting room list, you will have to invite the resource as an attendee
OR - Invite the Resource Calendar as an Attendee, the same as in Convergence. Calendars addresses are in the format of CAL-Department-Building-Room@uwo.ca (ex. CAL-ITS-SSB-3333@uwo.ca) and can be found by clicking the + button next to Add People, entering your Department code (ex. WTS) in the Search People box, and clicking magnifying glass button.
- Click the Save button
Subscribing to Calendars
Procedure
Personal Calendars
Step 1 – Go to myoffice.uwo.ca and login, go to your Calendar
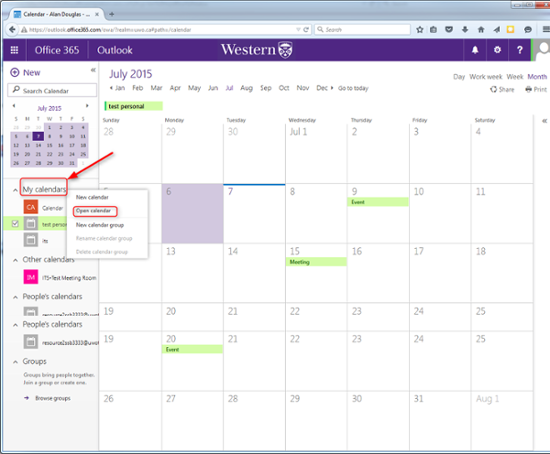
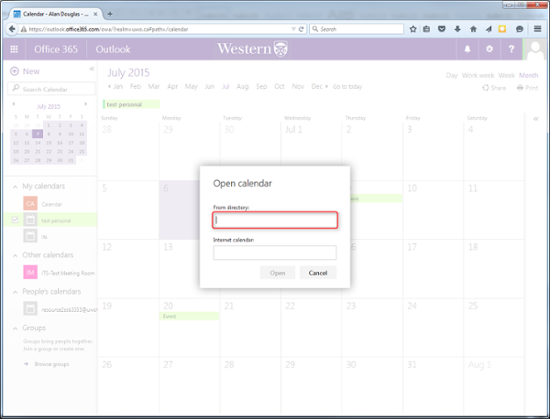
Step 2 – Right Click on “My calendars” on the left. Click Open Calendar.
Step 3 – Enter the email address of the person whose calendar you wish to subscribe to in the “From directory:” box. Click Open.
Resource Calendars
Step 1 – Go to myoffice.uwo.ca and login, go to your Calendar
Step 2 – Right Click on “My calendars” on the left. Click Open Calendar.
Step 3 - Enter your Department ID in the "from directory" field. Click Search Directory
Step 4 - Select the desired resource calendar from the results, click Open
Delegated Calendar Access
Procedure
You can give anyone within your organization editor or delegate access to your calendar. You can't give editor or delegate access to people outside your organization.
- Sign in to Office 365 from myoffice.uwo.ca. Select Calendar --> Share. In the Share drop-down box, click Calendar.
- In the Share with box, type the name or email address of the person you want to share your calendar with.
- After you've added the person or people whom you want to be able to manage your calendar, click the drop-down box to the right of their name, and select the level of access you want them to have.
- Select Editor to give them permission to make changes to your calendar.
- Select Delegate to give them the same permission as an editor, plus be able to send and respond to meeting requests for you.
- The options Full details, Limited details, and Availability only, allow others only to view your calendar, not make changes to it.
- After you've finished adding colleagues with whom to share your calendar, set their access levels, and have chosen which calendar to share with them, select Send. If you decide not to share your calendar right now, select Discard.
NOTE: If you're sharing a calendar other than your primary calendar, such as a project calendar that you've added to your account, you can give permission only for Full details or Editor access to that calendar.
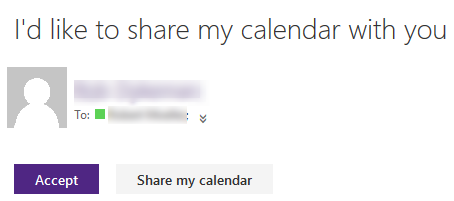
The people you share your calendar with receive an email message telling them about it. The message invitation includes two options: one to add your calendar to their calendar view, and another to share their calendar with you.
When your colleague adds your calendar to their calendar view, your calendar will be added to Other calendars.
NOTE: Calendar items marked Private are protected. Most people you share your calendar with see only the time of items marked Private, not the subject, location, or other details however you can give a delegate permission to see the details of items marked Private.
Set meeting request and response options
Once you've given someone delegate access to your calendar, you'll see an additional option under Calendar permissions that lets you control how meeting requests and responses are processed.
To set these options:
- Go to your Calendar in Outlook on the web for business.
- Go to the calendar navigation pane, and under My calendars, right-click Calendar.
- Click Permissions.
- In Global delegate options, for Send invitations and responses to, select one of the following options:
- Delegate only. Send me notifications. Meeting requests and responses are sent to you and your delegates. Only your delegates see the option to accept or decline a meeting request.
- Delegate only. Meeting requests and responses go only to your delegates.
- Both my delegate and me. Meeting requests and responses are sent both to you and your delegates.
- Select Save to save your changes or Discard to cancel.
Let delegates see details of private items
You can use the calendar permission settings to give delegates permission to see the details of items that have been marked as private.
- Go to your Calendar in Outlook on the web for business.
- Go to the calendar navigation pane, and under My calendars, right-click Calendar.
- Select Permissions.
- Select the person you want to give permission to see private appointments. If they don't already have delegate access, you can give them that permission now.
- Select Allow viewing of private events.
- Select Save to save your changes or Discard to cancel.
Share a Calendar
Procedure
Method 1 – Share your Calendar with specific individuals
Note: If you are trying to assign Edit permissions to someone, share your calendar using the steps for Outlook Web Access.
Outlook Web Access (OWA)
- Go to myoffice.uwo.ca and login, go to your Calendar
- Select the Calendar you wish to share, click the Share button in the top right corner
- Enter the Email Address of the person you wish to share your calendar with in the “Share with:” field. Choose what permissions they have using the Permissions dropdown box.
- Enter a personal subject line if desired, and click the Send button
Outlook 2016/2019
- Open Outlook, go to your Calendar
- Select the Calendar you want to share, click the Share Calendar button at the top
- Enter the email address of the person you wish to share your Calendar with
- Use the “Details” dropdown to set your Calendar detail visibility
- Enter a personal message if desired and click Send
Method 2 – Publish your Calendar online to be viewed by anyone with the link
Outlook Web Access (OWA)
- Go to myoffice.uwo.ca and login, go to your Calendar
- Click Settings-->Options
- Click Publish Calendar on the left
- Select the Calendar you wish to share from the drop-down menu
- Select “Availability Only” from the “select permissions” menu
- Click the Save button
Outlook 2016/2019
- Open Outlook, go to your Calendar
- Select the Calendar you want to publish, click the Publish Online button at the top
- Select “Publish This Calendar”
- Select the Calendar you wish to share from the drop-down menu
- Select “Availability Only” from the “select permissions” menu
- Click the Save button
Backup Calendar Attachments
Procedure
From Outlook 2016/2019
- Open Outlook, go to Calendar
- Click File
- Click Save Calendar
- Click More Options
- Change the Date Range to the dates you wish to save
- Change “Detail” to say “Full Details”
- Click the “Show” button next to Advanced
- Check “Include attachments within calendar items”
- Click “OK”
- Click “Save”
Backup a Calendar
Procedure
From Outlook 2016/2019
- Open Outlook, go to Calendar
- Click File
- Click Save Calendar
- Click More Options
- Change the Date Range to the dates you wish to save
- Change “Detail” to say “Full Details”
- Click “OK”
- Click “Save”
Import Tasks
Procedure
Importing Tasks into Outlook 2016/2019
- Select FILE in the upper left hand corner, select Open & Export and click Import/Export
- Select Import from another program or file and click Next
- Select Outlook Data File (.pst) and click Next
- Click browse, select the file you want to import and click OK
- Select the Do not import duplicate items radio button and click Next
- Click Finish and your Tasks will be imported
Export Tasks
Procedure
Exporting Tasks from Outlook 2016/2019
- Select FILE in the upper left hand corner, select Open & Export and click Import/Export
- Select Export to a file and click Next
- Select Outlook Data File (.pst) and click Next
- Select Tasks from the drop down and click Next
- Select browse, choose a location, enter a file name and click OK
- Select the Do not export duplicate items radio button and click Finish
- Outlook will prompt you to put a password on this file, for simplicity leave it blank and click OK
Multi-Calendar Environment
Procedure
Office 365 users are recommended to create a calendar sharing link. Users who visit your calendar sharing link will be able to view your Calendar in a webpage. This will allow users still in Convergence to view your Free/Busy information.
Method 1 – Share your Calendar with specific individuals
Outlook Web Access (OWA)
- Go to myoffice.uwo.ca and login, go to your Calendar
- Select the Calendar you wish to share, click the Share button in the top right corner
- Enter the Email Address of the person you wish to share your calendar with in the “Share with:” field. Choose what permissions they have using the Permissions dropdown box.
- Enter a personal subject line if desired, and click the Send button
Outlook 2016/2019
- Open Outlook, go to your Calendar
- Select the Calendar you want to share, click the Share Calendar button at the top
- Enter the email address of the person you wish to share your Calendar with
- Use the “Details” dropdown to set your Calendar detail visibility
- Enter a personal message if desired and click Send
Method 2 – Publish your Calendar online to be viewed by anyone with the link
Outlook Web Access (OWA)
- Go to myoffice.uwo.ca and login, go to your Calendar
- Click Settings-->Options
- Click Publish Calendar on the left
- Select the Calendar you wish to share from the drop-down menu
- Select “Availability Only” from the “select permissions” menu
- Click the Save button
Outlook 2016/2019
- Open Outlook, go to your Calendar
- Select the Calendar you want to publish, click the Publish Online button at the top
- Select “Publish This Calendar”
- Select the Calendar you wish to share from the drop-down menu
- Select “Availability Only” from the “select permissions” menu
- Click the Save button
Using Doodle Polls
Using a Doodle Poll is another method for Office 365 users to check free/busy information for Convergence users. A Doodle Poll is a free online scheduling tool that can be used to facilitate scheduling a meeting with a group of people. You select a number of potential times and send the poll to the people you wish to meet with. They select all the times they are available, you can then use this information to book a meeting at the appropriate time.
Published on and maintained in Cascade.