
AV Bridge - As a Service
The A/V Bridge provides an option to enable your laptop to host a virtual conferencing session that will also leverage the a/v system's local camera(s) and microphone(s).
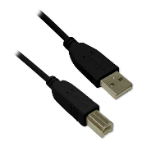
Presenters must provide their own USB A->B cable to make the physical connection between their laptop and the a/v system. See: Laptop Host Requirements below.
How it works
By default, the audio and video signals from the a/v system's camera(s) and microphone(s), are routed to the classroom Rack PC. If you prefer to host a virtual conferencing session from your laptop instead of the Rack PC, you will need to select this on the a/v touch-screen control and connect your laptop to the AV Console with a USB A ->B cable.
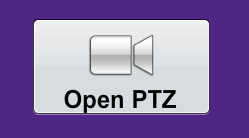
On the A/V System’s Touch Screen:
- Tap "Open PTZ"
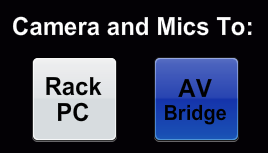
- Locate the "Camera and Mics To:" option
- Tap "AV Bridge"
Note: Switching between Rack PC and AV Bridge will interrupt the a/v signal between the local camera(s) and mic(s) and any related applications on the selected host.
Laptop Host Requirements
- User-supplied laptop; powered up and fully booted into a Windows, or Mac environment.
- Virtual conferencing software client is installed, and is operational on the laptop.
- User-supplied USB A ->B cable (USB v2, or v3)
Note: For best overall performance it is recommended that the laptop is energized from an electrical outlet, rather than running on battery power.
Published on and maintained in Cascade.