Search Website
Email Setup and Settings
Email Setup Guides
Microsoft 365 will fully integrate your email, calendar, and contacts with almost every current desktop email client. The guides in this section will walk you through setting up your Microsoft 365 email account on your devices.
Step 1
Open Outlook 365.
Note
If this is the first time running Outlook it will start a setup configuration wizard. Click Next until prompted for your Email address, then proceed to step 4.
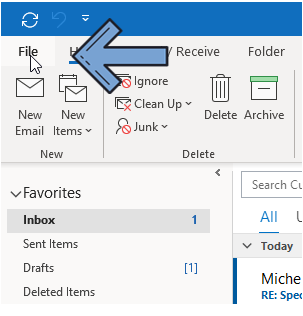
Step 2
On the top left corner, click on File.
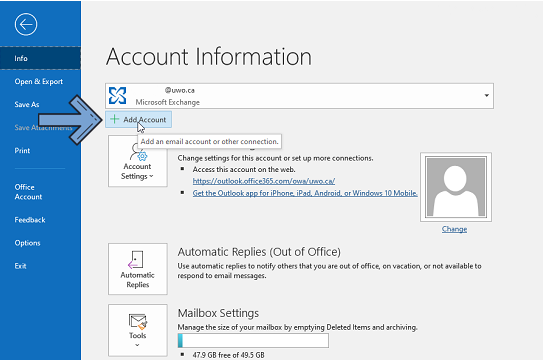
Step 3
Click on Add Account.
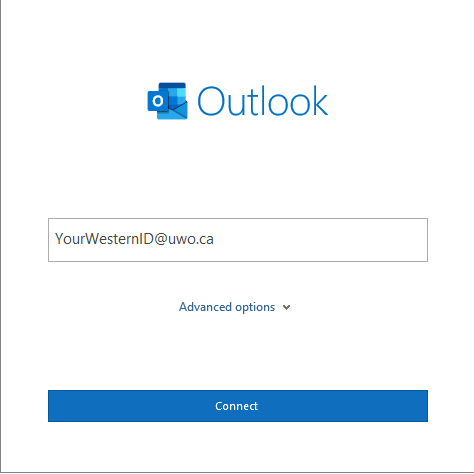
Step 4
Enter your Western email address, then click Connect.
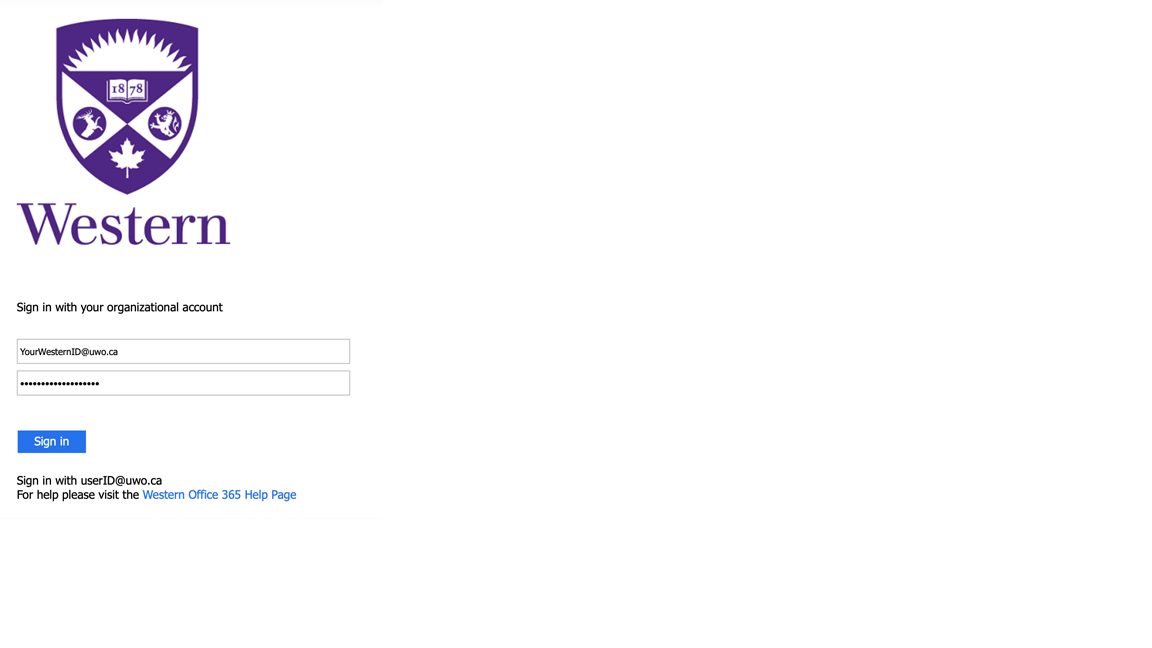
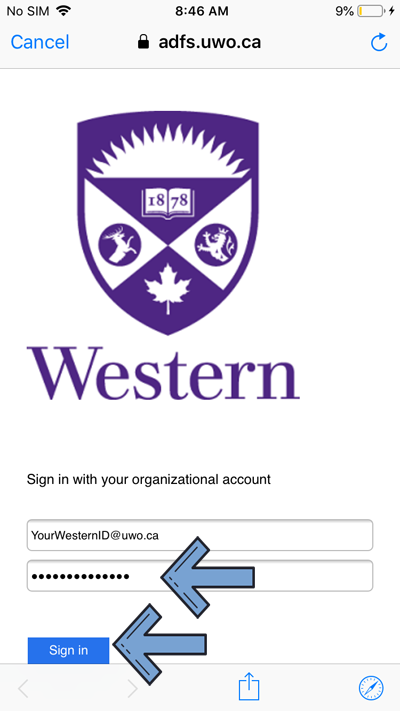
Step 5
Enter your password, then click on Sign In.
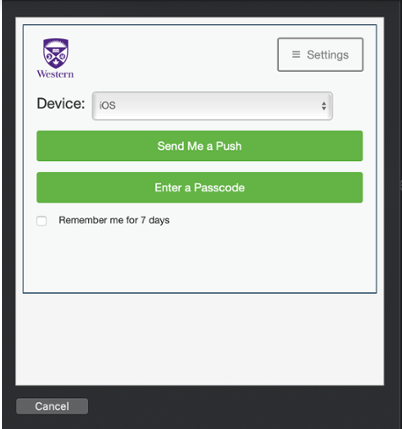
Step 6
If you have opted in to MFA for Office 365, the following screen will appear. Select your preferred MFA method to continue signing in.
If you have not opted in to MFA for Office 365, you can proceed directly to Step 7.
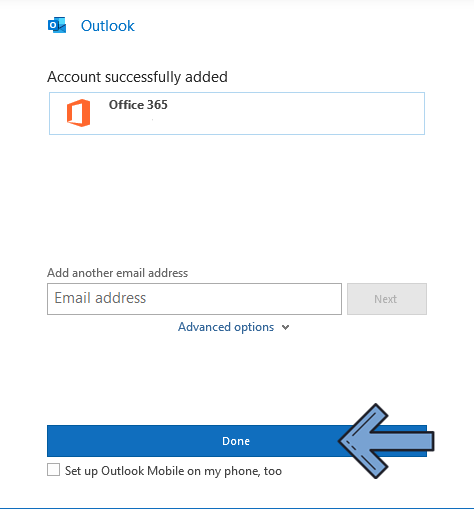
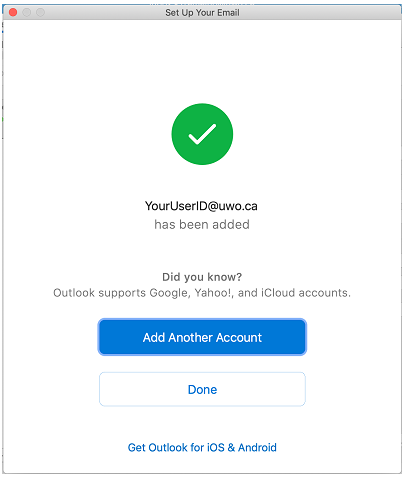
Step 7
The following screen shows that your email was configured correctly. Click on Done.
Step 1
Open Outlook 365.
Note
If this is the first time running Outlook it will start a setup configuration wizard. Follow the steps until prompted for your Email address, then proceed to step 6.
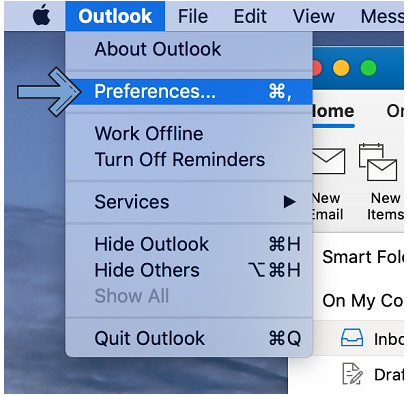
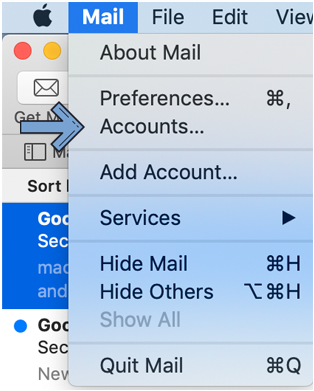
Step 2
On the top left corner, click on Outlook, then Preferences.
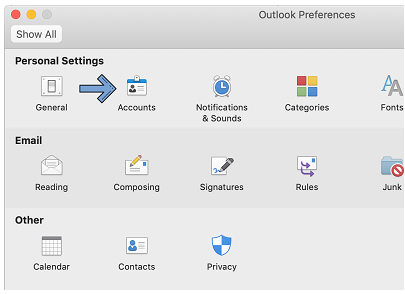
Step 3
Click on Accounts.
Step 4
On the bottom left courner, click on the + icon.
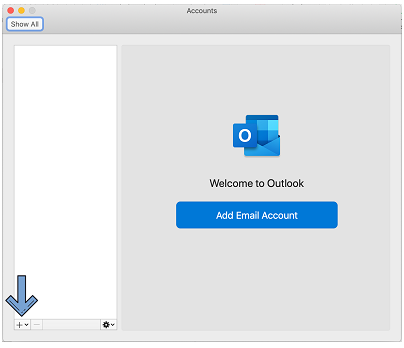
Step 5
Click on New Account.

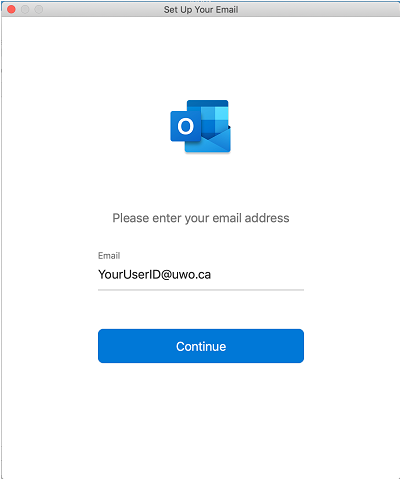
Step 6
Enter your email address, then click on Continue.
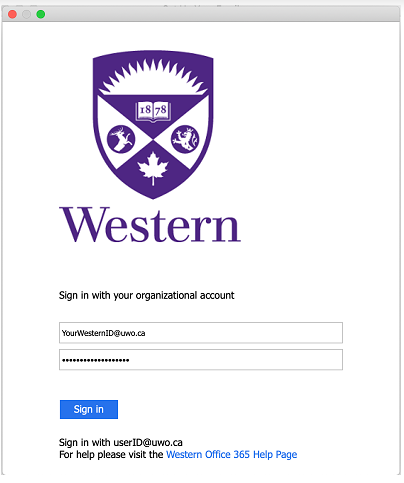
Step 7
Enter your Western password and click on Sign In.
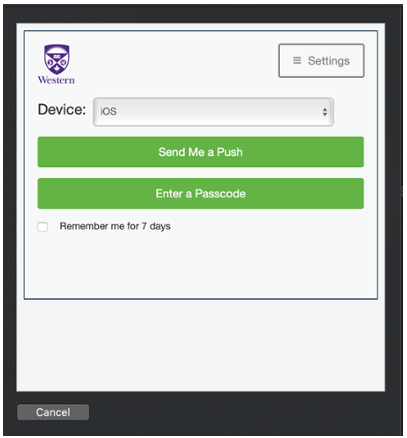
Step 8
If you have opted in to MFA for Office 365, the following screen will appear. Select your preferred MFA method to continue signing in.
If you have not opted in to MFA for Office 365, you can proceed directly to Step 9.
Step 9
The following screen shows that your email was configured correctly. Click on Done.
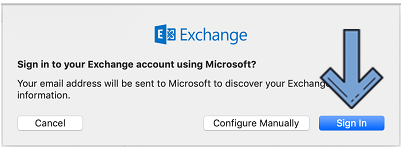
Step 1
Open Mac Mail.
Step 2
Click Mail > Accounts.
Step 3
Click on the + button.

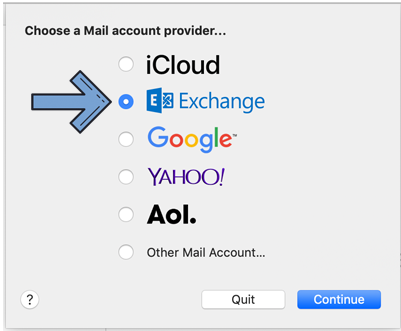
Step 4
If asked to choose the account type, tap Exchange, click Continue.
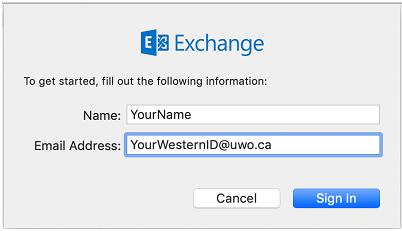
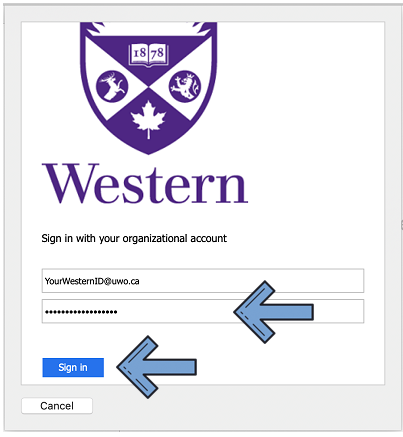
Step 5
Enter your name and email address, then click Sign In.
Step 6
The following screen will pop-up. Click on Sign In.
Step 7
On the following page, type your Western email password, then click on Sign In.
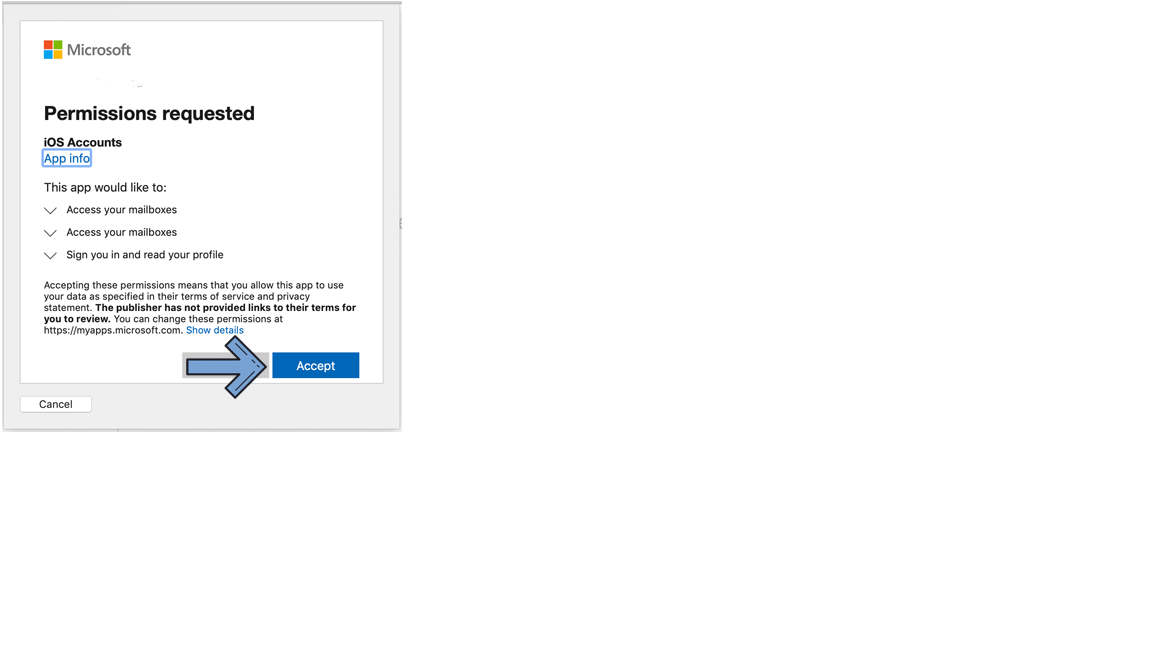
Step 8
You might be prompted for permissions. Click on Accept.
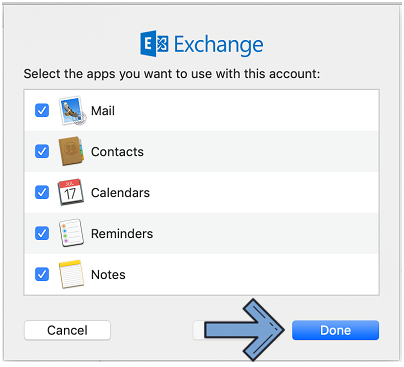
Step 9
Click on Done.
The Outlook app can be downloaded from the Google Play Store.
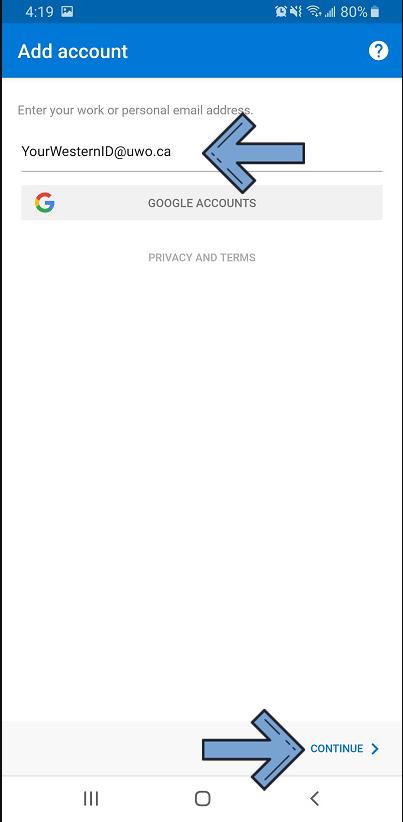
Step 1
Open the Outlook app. Click on Get Started.

Step 2
Enter your Western email address, and click on Continue.
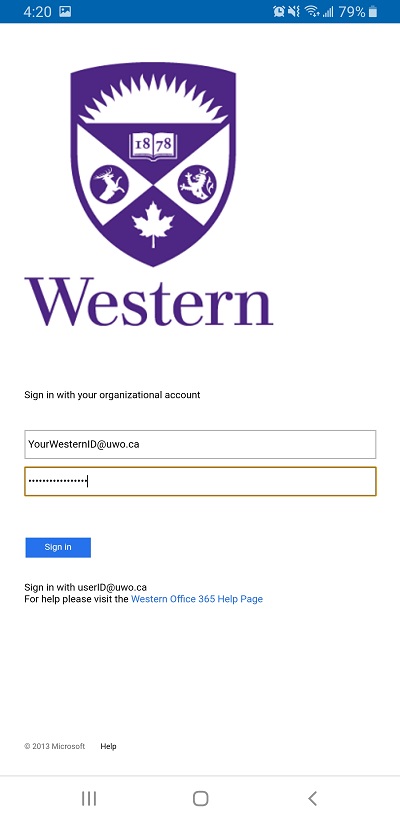
Step 3
Enter your Western password, and click on Sign In.
Step 4
If you have opted in to MFA for Office 365, the following screen will appear. Select your preferred MFA method to continue signing in.
If you have not opted in to MFA for Office 365, you can proceed directly to Step 5.
Step 5
If you are setting up only your Western account, click on Skip. If you want to add another account to your Outlook, click Continue.
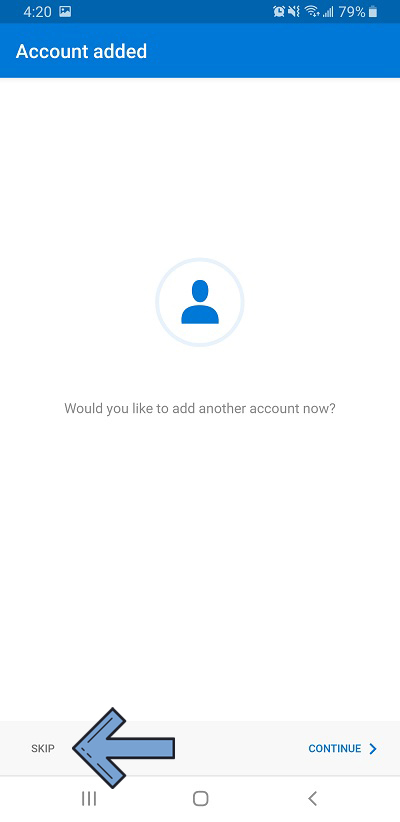
Your email can now be accessed from the Outlook app.

The Microsoft Outlook for iOS can be downloaded from the Apple App Store.
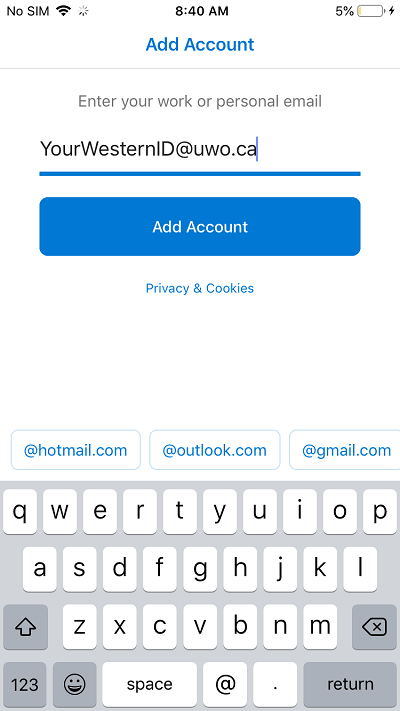
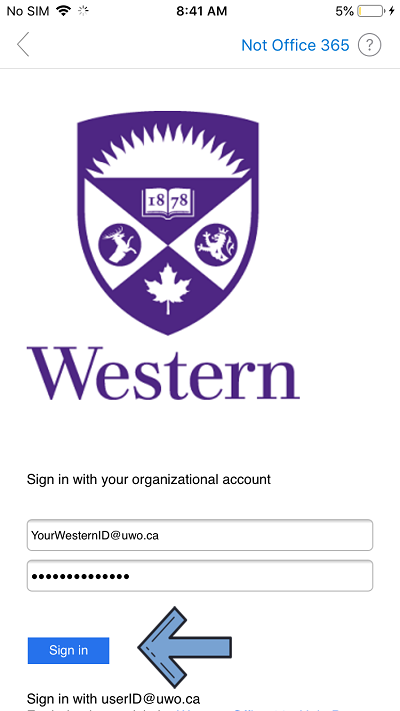
Step 1
Open Outlook. Enter your Western email, and click on Continue.
Step 2
Enter your Western password, and click on Sign In.
Step 3
If you have opted in to MFA for Office 365, the following screen will appear. Select your preferred MFA method to continue signing in.
If you have not opted in to MFA for Office 365, you can proceed directly to Step 4.
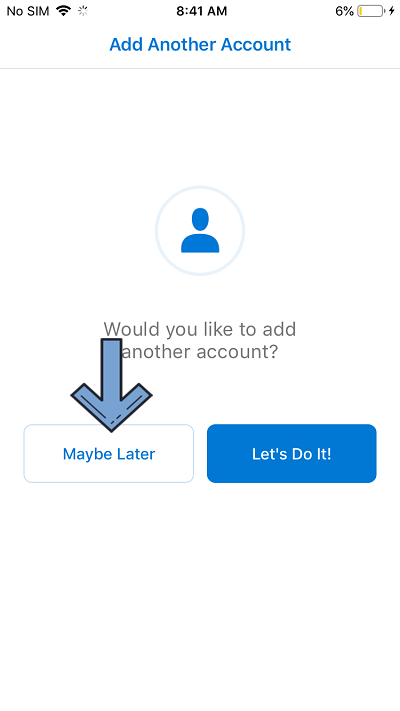
Step 4
If you are setting up only your Western account, click on "Maybe Later". If you want to add another account to your Outlook, click on "Let's Do It!".
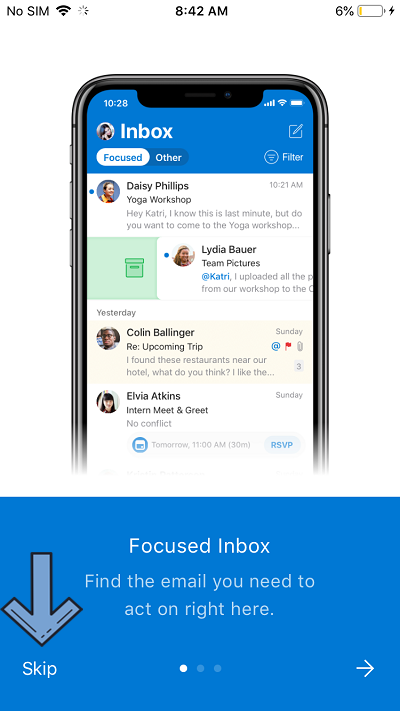
Step 5
The app will show you information about some of the features. Click Skip.
Your email can now be accessed from the Outlook app.
Step 1
Open Settings.

Step 2
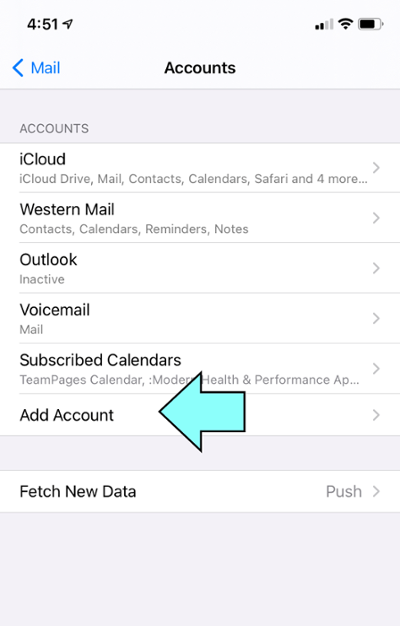
Click on Mail and then on Accounts.
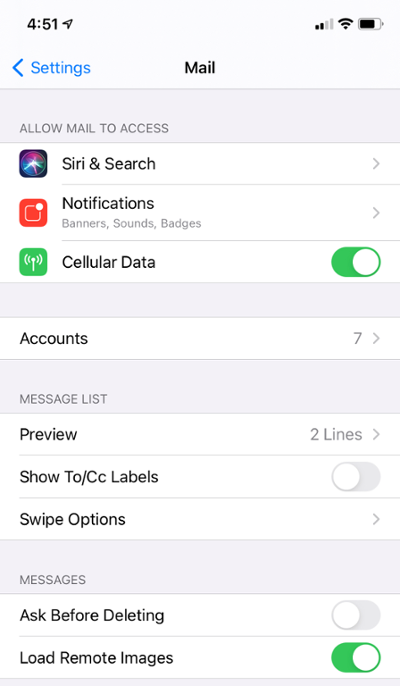
Step 3
Click on Add Account.
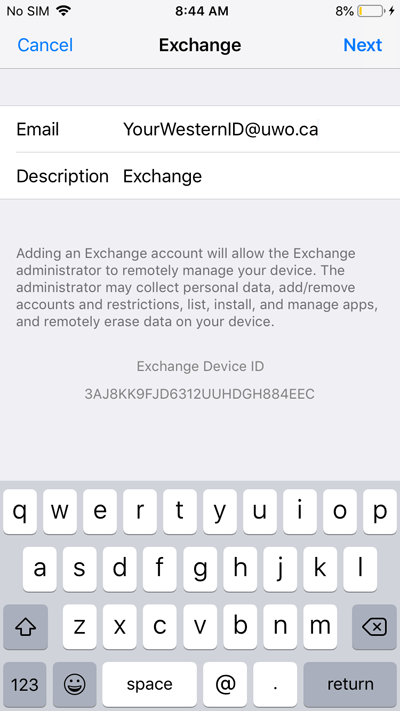
Step 4
Select Microsoft Exchange.
Step 5
Enter your Western email address, then click on Next.
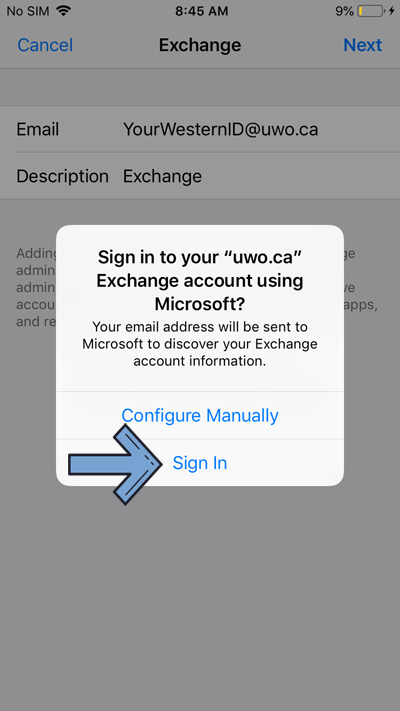
Step 6
Click on Sign In.
Step 7
When prompted, enter your Western password, and click on Sign In.
Step 8
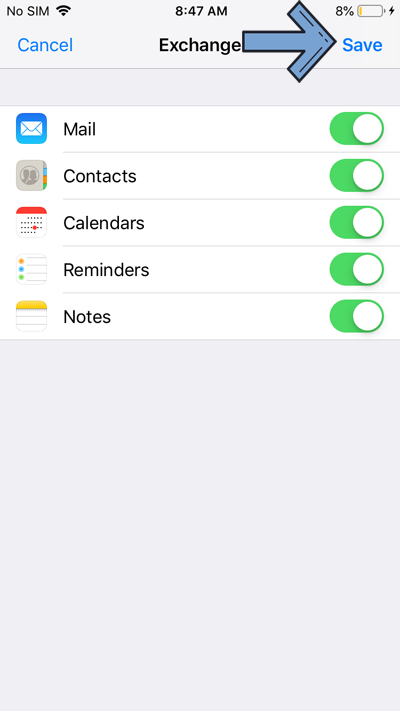
The following screen might ask you if you trust the app. Click on Continue.

Step 9
At this step, you are able to configure what features will be synchronized. For the full experience, leave all features checked and click on Save.
Email Settings
This procedure will explain how to redirect messages from your Microsoft 365 email address to another email address. If you forward your mail, all new messages will automatically be sent to the address you specified.
Some examples of when you might want to use mail forwarding:
- If you have more than one email address
- if you are going to be away and you would like someone else to respond to your emails during this time.
Turn ON Email Forwarding
Getting Started...
- Go to myoffice.uwo.ca and login, click on Outlook
- Click the Gear icon in the top right
- Click on "View all Outlook settings"
- In the left sidebar, under 'Mail' click 'Forwarding'
- Click "Enable Forwarding"
- Enter the email address you wish to forward to. Ensure "Keep a copy of forwarded messages" is selected
- Click "Save" at the bottom
Testing Mail Forwarding
Be sure to test that your email is being correctly forwarded to avoid generating a mail loop.
- Send a message to your Western email address.
- Check your destination email account (the place you forwarded your messages to). The new message you sent should be there.
- Your test message will appear in the inbox of your Western email address as well, unless you have removed the checkmark from Keep a Copy of the message
Turn OFF Email Forwarding
Getting Started...
- Go to myoffice.uwo.ca and login, click on Outlook
- Click the Gear icon in the top right
- Click on "View all Outlook settings"
- In the left sidebar, under 'Mail' click 'Forwarding'
- Uncheck "Enable Forwarding"
- Click "Save"
For more information about records management, please see https://en.wikipedia.org/wiki/Records_management.
For Information about Western University's Records and Archives Policy, please see https://www.uwo.ca/univsec/pdf/policies_procedures/section1/mapp130.pdf
Depending on the percentage of messages which meet your requirement you can consider the various options listed below:
- Level 1
- Use a full mail client such as Outlook or Mac Mail and copy messages to a local folder OR
- Use Outlook and take advantage of its Auto Archiving feature
- Level 2 - Option A
- Print and store a hard copy of the message
- Please consider the environment.
- Level 2 - Option B
- use 3rd party tools associated with either the client or OS to backup and if necessary recover the appropriate system source files AND use one of the options listed in Level 1.
Level 1
Export an Outlook Data File (.pst)
- Open Outlook
- Navigate to File (top left) -> Open & Export
- Select Import / Export
- Select Export to a file, click Next
- Select Outlook Data File (.pst), click Next
- From here you can export a single folder, or your entire mailbox by clicking on your email address at the top - click Next to continue
- Click Browse and choose a name and location to save your .pst file, click OK
- You will be prompted about adding an optional password. If you’d prefer to create the data file without a password, leave the fields blank and click “OK” to finish
Export your Mac Mail mailbox (.mbox)
- Select your mailbox from the left pane
- Select “Mailbox” -> Export Mailbox
- Browse for a destination folder for your mailbox file, select Choose to confirm, creating a local mbox file containing your entire mailbox
Using Time Machine with Mac Mail (Mac only)
Mac devices have a built-in application called Time Machine, which creates automatic backups of files and apps while an external hard drive is connected to the device.
- Connect an external hard drive to the Mac
- Click the Apple logo in the top left and select System Preferences
- Select Time Machine from the available options
- Click on the Select Backup Disk button, select your external hard drive and click Use Disk
- This toggles the Time Machine switch to On, so it will now create regular backups of all files and apps onto the external drive, including your exported .mbox file and your Mac Mail application
What is a PST file?
A Personal Storage Table (.pst) is an open proprietary file format used to store copies of messages, calendar events, and other items within Microsoft Outlook. You can use this to back up and transfer local copies of your mailbox.
How to Import PST files
Outlook 365 Application
- Start Outlook Click File
- Click "Open & Export" on the left
- Click Import/Export
- Select "Import from another program or file"
- Select "Outlook Data File (.pst)", click Next
- Click Browse and navigate to your saved .pst file, click Next
- Select "Import items to the same folder in" and make sure your UWO account is selected in the drop-down
- Click Finish
How to Export PST files
Outlook 365 Application
- Start Outlook
- Click File
- Click "Open & Export" on the left
- Click Import/Export
- Select "Export to a file", click Next
- Select "Outlook Data File (.pst)", click Next
- Select your @uwo.ca email address to backup your emails, or select Outlook Data File to backup personal contacts and local folders
- Click Next
- Click Browse and choose a name and location to save your .pst file, click OK
- Click Finish
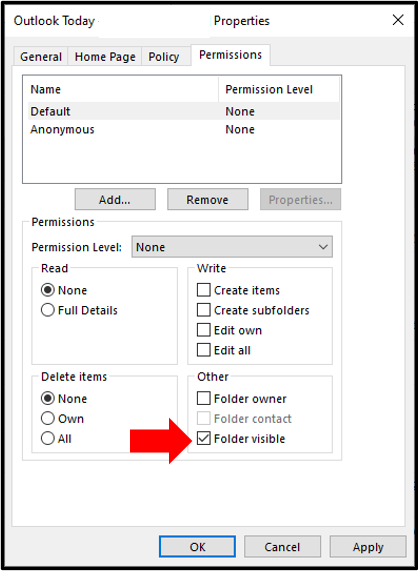
Step 1 - Set the Default Permission on Your Mailbox
Outlook 365 Application (Windows)
- Open Outlook
- Click on the Inbox
- Right Click your email address (where it shows above Inbox), click Folder Permissions
- Click Default, in the box at the top
- In the Permissions section, go to Other, and select "Folder Visible", click Apply and then click OK
Outlook on the Web
- Go to myoffice.uwo.ca and sign in
- Click the Outlook icon to open Outlook
- Right click Folders and click "Sharing and Permissions"
- Click "Folder Visible" and click OK
Step 2 - Share your Email Folder
Outlook 365 Application (Windows)
- Open Outlook
- Click on the Inbox
- Right Click the folder you want to share, click Properties
- Click the Permissions tab
- Click the Add button
- Enter the Name of the person you wish to share with in the search box
- Click their name to select them, then click Add
- Click OK
Outlook on the Web
- Go to myoffice.uwo.ca and sign in
- Click on "Outlook" to open your mailbox.
- Right click the folder you'd like to share and click "Sharing and Permissions"
- Click the "+" icon and search for the user you'd like to add and click "Add".
- Click OK
Use the tick boxes to select what specific permissions to assign the user. Use the Permission Level drop-down menu to easily set pre-defined sets of permissions.
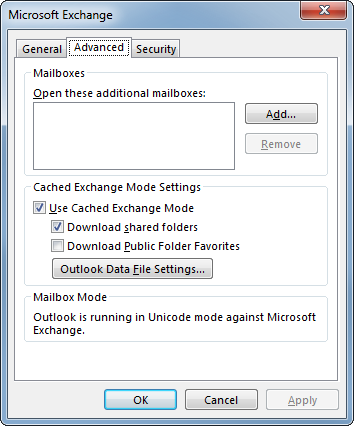
Outlook 365 Application (Windows)
1. Open Outlook
2. Click on File
3. Click Account Settings button, and then click the Account Settings... button that appears below
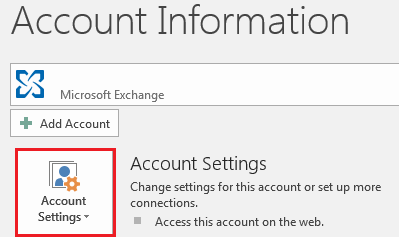
4. Click the Email tab in the list
5. Click the Change button and then click More Settings
6. On the Advanced tab, under Open these additional mailboxes, click Add, and then enter the mailbox name of the person whose mailbox that you want to add to your user profile. If you do not know the mailbox name, ask the person who granted you permissions
Outlook Web Access (OWA)
1. Go to https://myoffice.uwo.ca and login
2. Click on the Mail icon
3. Right-Click your name (where it shows above Inbox), click Add shared folder…
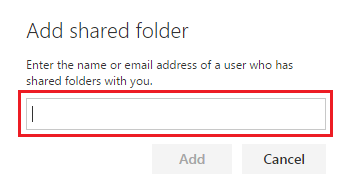
4. Enter the email address of the person that owns the folder you wish to add
5. Click the Add button
The Shared folder should now appear in your folder list under a Shared Folders heading.
When you recall an email, the message that you sent is retrieved from the mailboxes of the recipients who haven’t yet opened it. You can only recall messages that have not been read or moved out of the recipient's Inbox.
NOTE:
This feature is not available in the Outlook Web App (OWA).Procedure
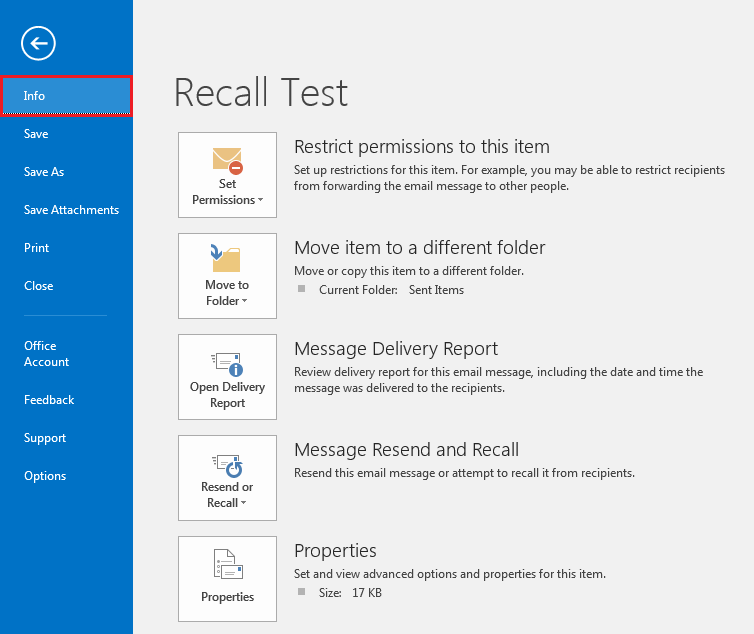
1. Start Outlook 365.
2. In the folder pane, click the 'Sent Items' folder.
3. Locate the email message you wish to recall, double click on the message. The email should open in a new window.
4. Click 'File'
5. In the left pane click 'Info'
6. Click the button 'Resend or Recall'
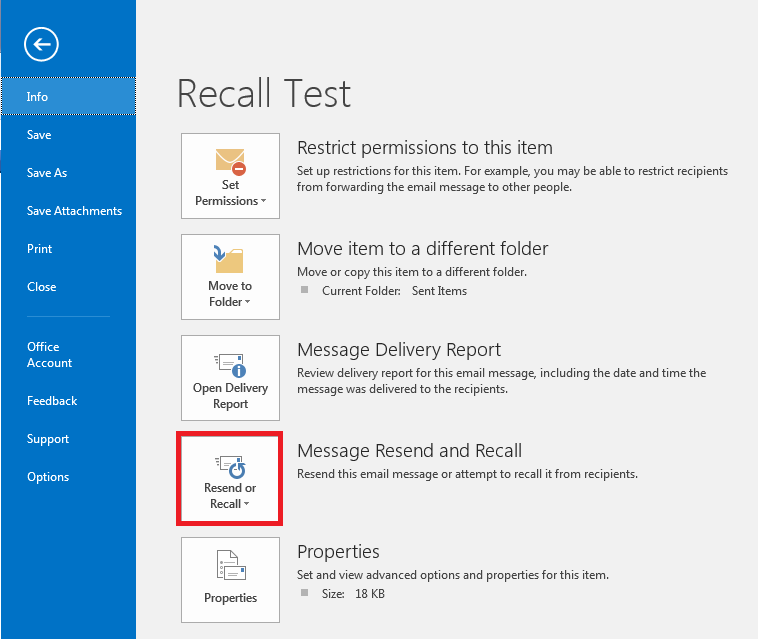
7. Click 'Recall this message...' that appears below

8. In the new window that appears press the 'OK' button.
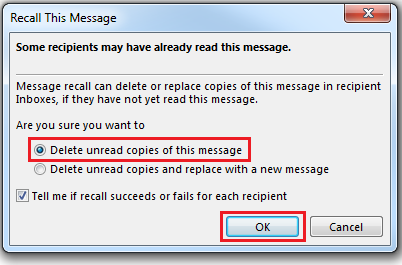
9. If the message is recalled successfully you will receive an email with the subject: 'Message Recall Success:'
Outlook 365 Desktop Application
- Click 'File'
- Click 'Automatic Replies'
- Select 'Send automatic replies'
- Specify a range of dates, if desired
- Click the 'Inside My Organization' tab and set your vacation message
- Click the 'Outside My Organization' tab and set your vacation message
- Click 'OK'
Outlook Web App (OWA)
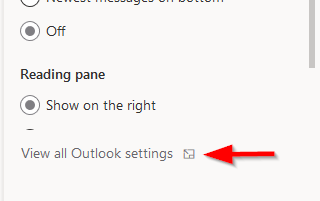
1. Go to https://myoffice.uwo.ca and login, go to your Inbox
2. Click the Gear icon  in the top right
3. Click on View All Outlook Settings
4. Under Mail, click on Automatic Replies.
5. Turn on the Turn on automatic replies option.6. Specify a range of dates, if desired
7. Fill in your vacation message for both the "inside my organization" and the "outside my organization" section.
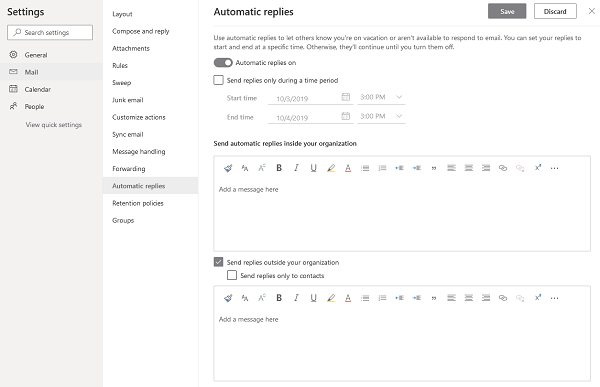
7. Click 'Save'
How to create a signature
Outlook Web Access (OWA)
1. Go to myoffice.uwo.ca and login, go to your Outlook
2. Click the Gear icon in the top right
3. Under Mail > Compose and reply you can set your email signature.
3b. Enter an email signature into the blank box.
To include the Western shield logo in your signature, right click the image below and click Copy Image. Paste the image into the signature box in OWA
For Faculty specific logos, https://communications.uwo.ca/comms/western_brand/email_signature.html
4. Click 'Save'

Outlook 365 Application
- Open Outlook
- Click File
- Click Options
- Click Mail
- Click Signatures
- Click the “New” button and enter a name for your signature
- If you saved your Email Signature before migrating, then find that document and Copy/Paste your Signature into the box
- Click OK
How to back up your signature
Outlook 365 Application
- Click File
- Click Options
- Click Mail
- Click Signatures
- Highlight your Email Signature and copy/paste it into a word document. Save the word document so you can recreate your signature after migrating.
Mac Mail
- Click Mail
- Click Preferences
- Click Signatures
- Highlight your Email Signature and copy/paste it into a word document. Save the word document so you can recreate your signature after migrating.
Outlook allows you to schedule emails to be sent at a date, and time that you specify.
Outlook on the Web
- Go to https://myoffice.uwo.ca and login, go to Outlook
- Click New Message
- After you're done composing your message, click on the downtick on Send and click Schedule Send.
- Choose your desired date and time and click Send
Outlook 365 Application
- Click "New Email" to start your new message
- In the "Tags" section in the ribbon, there is a Properties icon. Click that to open the message properties.
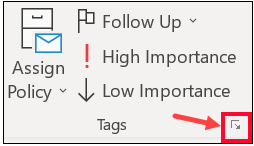
3. Check in the "Do not Deliver before" and select the day and time from the dropdown lists and click close, then send your message.
In Outlook for the Web you can change your default language and timezone.
Procedure
1. Go to https://myoffice.uwo.ca and login, go to Outlook
2. Click the Gear icon in the top right
3. Under General click Language and Time
4. Set your Language and Timezone as desired and click 'Save'