How do I... Approve a request in Jira?
Jira Service Management has an optional ticket approval process that can be used if the request requires approval before it can be processed.
WTS uses this approval process for central service requests such as requests for access to ROAMS or WTS Central File Storage (Walter) or the creation of Service Identities (SI's).
Typically, authorized approvers will be notified of this request via email, but you may also see any pending approval requests you have when you are logged into Jira.
How to Approve a Request in Jira - Via an email requesting your approval for a Jira ticket request:
- Click on the link provided in the email. This will take you to Jira, where you will be asked to log in. You will automatically be taken to the ticket once you have logged in.
- The Approve and Decline buttons are on the right side of the ticket.
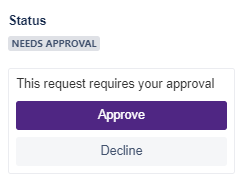
- If you want to approve the request, click Approve. If you need to decline the request for any reason, click Decline.
There is the opportunity to provide additional comments to WTS and the client, if you wish. This is helpful when the request has been Denied. You will find a box that says Add a comment in the ticket that you can use for this purpose.

- Once you have approved or declined the ticket and added any comments, you can log out of Jira.
If the ticket is approved, WTS will continue to work on the ticket. If the ticket is declined, WTS will contact the requester and instruct them to follow up with their department for more information on next steps.
How to Approve a Request in Jira - Via your Jira Request area in the Jira Portal:
- Log into Jira at https://westernu.atlassian.net/servicedesk/customer/portal/2
- Click the Requests button on the top right. You will see a list of different Request types to choose from.

- Click Approvals to see any tickets that require your approval.
- Click on the ticket you need to approve. If you know the ticket number, it will be listed under Reference. The information under Summary may also assist you in determining the ticket you are looking for.
- The Approve and Decline buttons are on the right side of the ticket.
-
If you want to approve the request, click Approve. If you need to decline the request for any reason, click Decline.
There is the opportunity to provide additional comments to WTS and the client, if you wish. This is helpful when the request has been Denied. You will find a box that says Add a comment in the ticket that you can use for this purpose.
- Once you have approved or declined the ticket and added any comments, you can log out of Jira.
If the ticket is approved, WTS will continue to work on the ticket. If the ticket is declined, WTS will contact the requester and instruct them to follow up with their department for more information on next steps.
Published on and maintained in Cascade.