

Search Website
Document Camera
The document camera (DocCam) renders a digital representation of printed materials, and physical objects for real-time projection onto a large video display.
The DocCam uses a small camera head that is mounted on an adjustable arm with an LED light for added illumination if required.
The camera also features image magnification, and zoom adjustments.

General Setup
Image Magnification and Overhead Transparency Functions
- Ensure the A/V System is turned "on", and that it is ready for use.
- On the AV System's control interface, select the DocCam as the active image source
- On the base of the DocCam, press the power button once to power on the device
- On the base of the DocCam press the focus button to ensure the captured image is clear
- Adjust the head of the DocCam so that its camera is pointed at the item you wish to display
- Adjust the LED light brightness to ensure there is no glare and the staging area is well lit
- When finished, press the DocCam's power button twice to power it "off"
Recording Images or Video
The Document Camera was designed to capture an image, relative to the presenter's point of view.
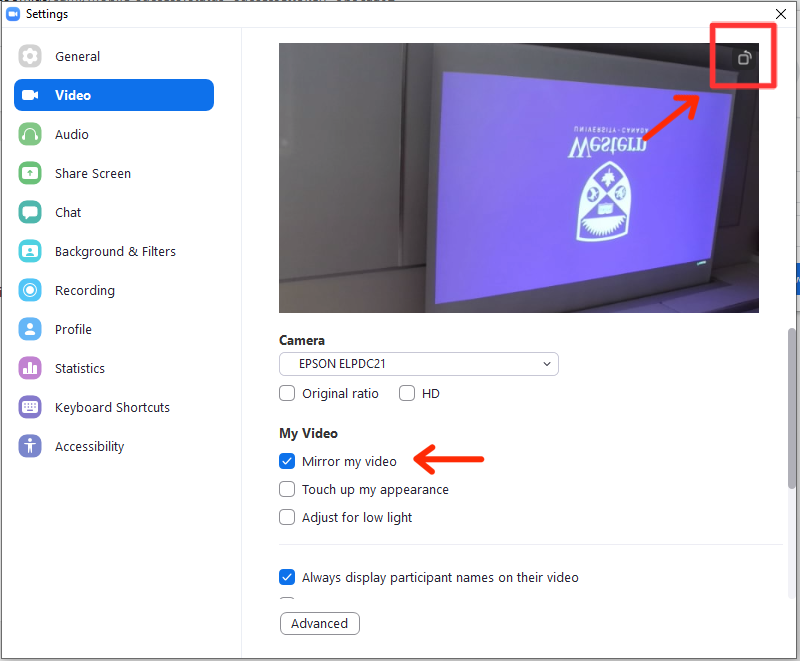
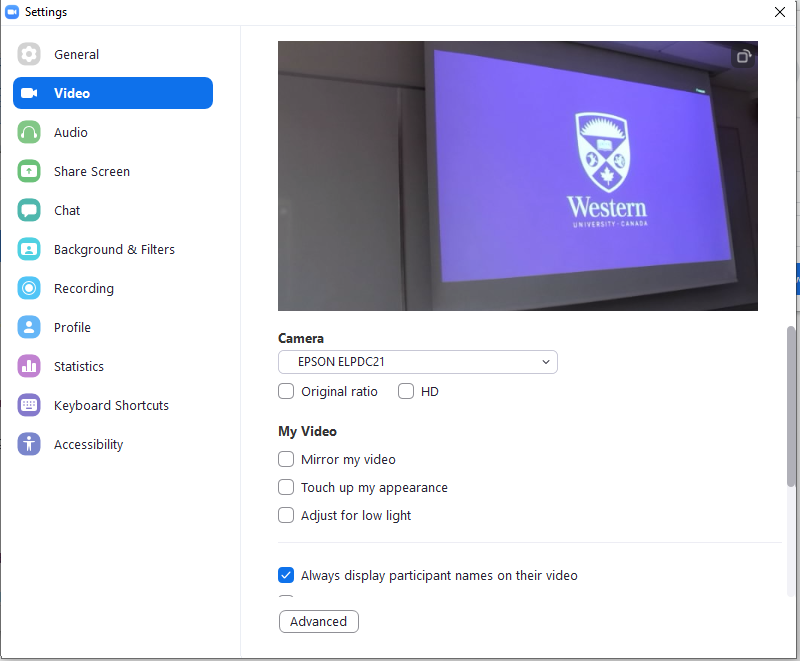
When using the document camera to stream video of the instructor and/or presentation content, the image may appear upside-down/inverted. To correct the orientation of the image, an adjustment must be made within the settings of the virtual conferencing tool, or after an output file has been created from the saved recording (see the following point).
- Turn on Document Camera and orient its head/lens as you deem appropriate for your use.
- Launch Zoom application from Start Menu on the classroom PC. This will automatically open the Western login page for Zoom sessions.
- Login using Western login credentials.
- Select "Open Zoom Meetings."
- In the Zoom application open the "Settings" menu in the top right corner.
- Select "Video" (Epson ELPDC21 will be default camera).
- Rotate Image using "Rotate 90⁰" button in the top right of camera preview. .
- Uncheck "Mirror my video" box.
Before

After
Images taken using the Camera App, are automatically saved to the following folder location on the classroom PC:
Username \ Pictures \ Camera Roll
By Default, Images taken using the Camera App are automatically saved in the *.JPG format.
Saved images taken with the Document Camera may appear upside down. The saved image file can be rotated on the classroom PC to correct the image rotation.
- Locate / search for the file using windows explorer
- Right click on the file
- Select "Rotate"
This rotation can be done to any still image file.
To rotate a video file, you will need to use your own 3rd party video-editing software.
Please note: Video editing software is not provided by CTG, and is not available on the classroom PC.