
Lecture Capture
Audio-visual systems installed in G.U. Classrooms support lecture capture.
The method of lecture capture is dependent on the content being presented. There are several ways to capture a lecture and so selecting the right tool for the task will produce a better recording. Please allow yourself time to comfortably set up lecture capture prior to your presentation, and enough time to process the recording after the lecture.
Note: Files may be copied or saved to the classroom computer during a session but will be automatically deleted when the computer is restarted or turned off. Any recorded files or captured content that you would like to keep should be saved to a personal USB drive or to the Western OneDrive account.
Audio Recording
A/V Systems that feature a CTG-managed Wireless Microphone and classroom PC, will support real-time capture of the presenter's voice as well as any pre-recorded audio content that is part of your virtual conferencing session. Using the integrated wireless lavalier microphone is the best way to ensure your voice will be reliably captured for recording, or streaming purposes
Windows Sound Recorder
For a simple audio recording application, the Windows Sound Recorder app (found in the Microsoft Store) can be used to record any incoming audio to the PC from the a/v system.
- Power up, and login to the classroom PC using your Western credentials (ending in "@uwo.ca")
- On the Windows desktop open the start menu and type "Microsoft Store".
- Open the Microsoft Store and search for the "Windows Sound Recorder " app.
- Select Download / Install to add the app.
- Once finished Open the Windows Sound Recorder app and start a recording.
When finished, the recorded audio file will automatically be saved to the folder:
Username \ Documents \ Sound Recordings
Note: The classroom PC cannot be used to store your data as this will be automatically deleted when the computer is restarted or turned off. Any recorded files must be moved/copied to a personal storage device before you end your session.
Audacity
The classroom PC features the pre-installed software: Audacity, that can be used to record any incoming audio to the PC from the a/v system.
- Power up, and login to the classroom PC using your Western credentials (ending in "@uwo.ca")
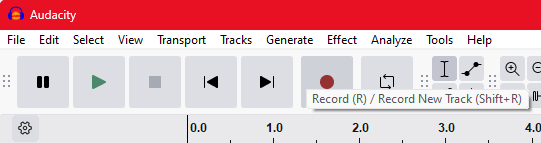
- On the Windows desktop open the start menu and type "Audacity"
- Open the Audacity app
- Click the red circle button or press "R" to start a recording
When finished, Press the stop button to stop the recording. To Save the recording:
- Open the "File" menu
- Click: Export Audio
- Select: Export to Computer
Please note that an Audio recording can be exported directly to a USB drive. By default, the file format created by Audacity would be a *.WAV file. This file type would have the highest quality but also generated the largest recording file and be the fastest to render. Selecting the Format MP3 as an alternative would provide a smaller file but may take longer to render.
PowerPoint
PowerPoint can be used to record audio directly into a presentation file.
- Open a PowerPoint presentation on the classroom PC
- Select the "Slide Show" tab
- Select "Record Slide Show" button
- Click "Start Recording"
By Default, PowerPoint will record narration and slide timings directly to the PowerPoint file. Once the prestation is finished, the PowerPoint can be saved with the instructor audio embedded into the prestation.
Audio + Video Recording
Real-time recording of the presenter’s voice is supported in every G.U. space that features a CTG-managed wireless lavalier microphone and classroom PC. All G.U. Classrooms with installed A/V technology support at least one integrated camera solution. Audio from wireless lavalier microphone, and video from the A/V camera are routed into the classroom PC for recording purposes.
Windows Camera App
The classroom PC features the "Windows Camera" app and can be used to record both audio and video.
- Power up, and login to the classroom PC using your Western credentials (ending in "@uwo.ca")
- On the Windows desktop open the start menu and type "Microsoft Store".
- Open the Microsoft Store and search for the "Windows Camera" app.
- Select Download / Install to add the app.
- Once finished Open the Windows Camera app to view the live camera.
The Camera app can be used to take still images in "Picture" mode or record Audio/Video in "Take Video" mode
When finished, the image or video file will automatically be saved to the folder:
Username \ Pictures \ Camera Roll
Note: The classroom PC cannot be used to store your data as this will be automatically deleted when the computer is restarted or turned off. Any recorded files must be moved/copied to a personal storage device before you end your session.
Virtual Conferencing Software
Western's supported Virtual Conferencing tools are Zoom and Microsoft Teams. Both applications can be used on any CTG-managed PC in a G.U. classroom. These virtual conferencing tools default to using the presenter microphone, and A/V camera that are part of the a/v system. Starting a recording from a supported Virtual Conferencing tool on the Classroom classroom PC will capture both the presenter microphone, and A/V camera
Screen Capture
A Zoom meeting can be used to record the displayed video content of a presentation or lecture.
- Start a Zoom Metting
- Click Share Screen
- Select "Screen 1" and click share
- Start Recording
Using this method, any content that is displayed on-screen will be recorded in your Zoom meeting. Any audio or video content that is shared by other participants in the Zoom meeting will also be recorded when using screen capture.
Looking for more Info?
Please feel free to book an AV Demo with our Service Desk to see all the Lecture Recording options that may be available in a particular G.U Classroom. We can meet with you in person to demonstrate how you can record your lecture using these method.